
The Repository Pattern and Unit Of Work in Action with Entity Framework 6
In this article I'll hope to demonstrate how my version of the repository pattern can be used with the Entity Framework 6 in your applications, and these applications could be any application that needs to communicate with a data source, in this case SQL Server.
By the end, I'll have an ASP.NET MVC 5 application built that implements various conventions to utilize the repository pattern for basic CRUD operations, and a couple custom operations.
What is the Repository Pattern?
The repository pattern is simply a pattern that allows you to abstract away the gunk needed to access data. Nobody wants to write tons of ADO.NET code to access data, at least I don't. So repository patterns help eliminate the need to write that type of data access code.
This version of the Repository Pattern is built is such a way as to extract away the CRUD operations into base classes for both the Data Objects layer, and the Service layer. This allows me to easily add and maintain my own custom operations without ever having to worry about conflicting with the CRUD operations.
Just to be clear, there is no correct way of implementing the Repository Pattern. The patterns is more of a concept, a principle, than a strict pattern or guideline. If you search the web for Repository Pattern and Unit Of Work, you'll find many articles on the subject, and each will most likely have a slightly different way of implementing the pattern.
Don't be stuck and confused with all the variations out there, take what you like from different sources and create your own.
The Demo Application
I quick word about the demo application, I use the Kendo UI components from Telerik and they are required in order for this application to work. You can download a free version of the product from the Telerik site and install it into the application.
Also the SQL Server scripts are in the App_Data folder if you want to create the database.
A Quick Look
Here's a look at the IRepository interface that I'll be using in this series. I grabbed it from the one used in the Tutorial on the Asp.Net site. When I decided to start building a Repository Pattern for my own purposes, I scoured the web to see what was out there. They were all very similar in what they were achieving, which was provide a way of accessing your data via an interface, which also makes it testable.
public interface IRepository<TEntity>{ IQueryable<TEntity> GetAll(); IQueryable<TEntity> Get( Expression<Func<TEntity, bool>> filter = null, Func<IQueryable<TEntity>, IOrderedQueryable<TEntity>> orderBy = null, string includeProperties = ""); TEntity GetById(object id); void Insert(TEntity entity); void Delete(object id); void Delete(TEntity entityToDelete); void Update(TEntity entityToUpdate);}The biggest difference with mine version of the Repository Pattern (and it's not unique) is that it's generic. Notice it takes a type of TEntity. This provides another layer of flexibility on the pattern. I also needed this extra feature to help make it code-generator friendly.
My plan was to incorporate this into my code-generator so I don't have to manually code this stuff for each application I build.
The code-generator was to generate all the CRUD operations for each table in the database that is selected.
A repository base class was created that implements this interface that contains all the CRUD operations, thereby encapsulating the functionality that is always used for every entity. By extracting the CRUD operations away in a base class, it also helped me provide custom interfaces for each entity that can be used for custom functions.
This shows how I can create an entity-specific interface that then implements the IRepository<TEntity> interface. An example is below.
public interface ITagDao : IRepository<Tag>{ // Custom members go here}
The Basis
At it's basic level, you want your repository to at least contain all the CRUD operations, and if possible, do it in a way to work with any entity you can throw at it.
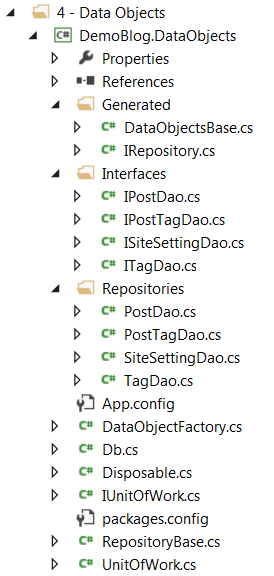
What I'll be building will be a Data Objects project in Visual Studio that will contain entities for a simple Blog application. It will look like this.
This is really pretty flexible and works nicely with the Entity Framework. This is the database schema for the Blog application that I'll be demonstrating:

You can see it's very straight-forward. The SiteSetting table is simply a table I include in all my projects where I can put various name/value pairs that I don't want cluttering up my appSettings section of the web.config file.
Let's get started building the Visual Studio 2013 project
This is the basic structure I use for all my applications. It organizes my folders and projects nicely so I know where everything is.
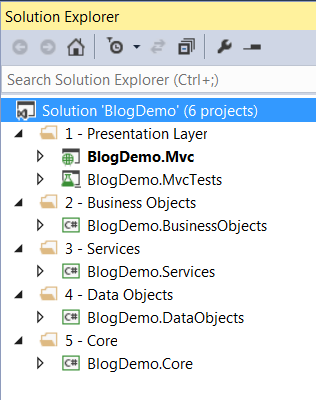
This gives me a nice visual representation of the layering of the physical structure behind the scenes, with the Presentation Layer at the top and the Data Objects at the bottom. All of the projects except for the Mvc application are C# Class Library projects.
The next step is to create the classes, or in my case, generate them.
Code-Generation
This step of the operation is not required or necessary for you to create a Repository Pattern. I'm just having my code-generator create all the code for several reasons:- I wrote the code generator
- Because I can :^)
- It's faster
- It works
- It's bug free
The code-generator doesn't do anything different than you could do manually, except it does it faster (generates all the code within a few seconds), and it's bug free. The reason I know it's bug free is because through many iterations, I've been able to weed out any bugs that existed and make this code clean and solid. I can rely on this code always working by being generated.
When I point my code-generator to my database, it generates all the code for the following layers:
- MVC Application - it creates some ViewData classes and CodeTemplates, etc.
- Business Objects - it creates one class (Entity) for each database table
- Services - it creates all the interfaces and concrete service classes
- Data Objects - it creates all the interfaces and concrete data objects classes and the Repository Pattern
- Core - this project contains any common code that can be used throughout the application
This is the result.
Business Objects
The business objects classes are complete with DataAnnotations attributes for my ASP.NET MVC application, and any other attributes I deemed necessary to work best for my application.

And here's the Post class.
using System;using System.Collections.Generic;using System.ComponentModel;using System.ComponentModel.DataAnnotations;using System.Web.Mvc;namespace BlogDemo.BusinessObjects{ public class Post: Entity { #region ctors public Post() { PostTagList = new HashSet<PostTag>(); } #endregion #region Properties [Required(ErrorMessage = "Title is required.")] [StringLength(500, ErrorMessage="Title must be between 1 and 500 characters.")] [DisplayName("Title")] public string Title { get; set; } [DisplayName("Sub Title")] public string SubTitle { get; set; } [DisplayName("Short Description")] public string ShortDescription { get; set; } [DisplayName("Date Created")] public DateTime DateCreated { get; set; } [DisplayName("Date Updated")] public DateTime? DateUpdated { get; set; } [Required(ErrorMessage = "Author is required.")] [StringLength(50, ErrorMessage="Author must be between 1 and 50 characters.")] [DisplayName("Author")] public string Author { get; set; } [Required(ErrorMessage = "Body is required.")] [DataType(DataType.MultilineText)] [UIHint("Editor")] [DisplayName("Body")] public string Body { get; set; } [DisplayName("Views")] public int Views { get; set; } [DisplayName("Publish")] public bool Publish { get; set; } [DisplayName("Alias")] public string Alias { get; set; } public virtual ICollection<PostTag> PostTagList { get; set; } #endregion } }
The Entity base class contains the primary key property and the rowversion property.
using System;using System.Linq;using System.ComponentModel;using System.ComponentModel.DataAnnotations;using System.Web.Mvc;namespace BlogDemo.BusinessObjects{ public abstract class Entity { [Key] public int Id { get; set; } [HiddenInput(DisplayValue = false)] [Timestamp] public byte[] rowversion { get; set; } }}These classes are the Entity models that will be used by the Entity Framework and the DbContext.
Refactoring is easy. If you have to modify a database table and add a column for example, you simply need to add a property for the same data type in the class and you're done. No regenerating of anything.
Data Objects
The data objects is where Entity Framework communicates with the data store, such as SQL Server, and the Repository Pattern is really just a wrapper around the Entity Framework in order to get access to the data.
Some developers argue that the Repository Pattern is just an abstraction on top of an abstraction, that being the Entity Framework. But everyone knows that in order to make your application testable and flexible, you want to keep the Data Context out of your classes as much as possible, and absolutely absent from your controllers. For me, the Repository Pattern accomplishes this.
Once you build this interface layer, your classes just implement the interface and the methods that hang off of those interfaces. The beauty of this is that you don't and shouldn't have to be concerned with where your data is coming from. It could be coming from SQL Server, or MySql, or SQLite, or the moon, you shouldn't care! Just call the method and get some data.
This way if your underlying data store does ever change, your presentation layer will never know.
Here's what was generated for the data objects project:
You've seen the IRepository interface, here's the RepositoryBase class that contains all the wrapped EF operations.
001.using System;002.using System.Collections.Generic;003.using System.Data;004.using System.Data.Entity;005.using System.Linq;006.using System.Linq.Expressions;007. 008.namespace BlogDemo.DataObjects009.{010. public abstract class RepositoryBase<TEntity> where TEntity : class011. {012. #region Locals013. 014. internal Db _context;015. internal IDbSet<TEntity> _dbSet;016. 017. #endregion018. 019. #region ctors020. private readonly IUnitOfWork _unitOfWork;021. 022. public RepositoryBase(IUnitOfWork unitOfWork)023. {024. this._unitOfWork = unitOfWork;025. this._dbSet = Db.Set<TEntity>();026. }027. 028. #endregion029. 030. #region Public CRUD Methods031. 032. public virtual IQueryable<TEntity> GetAll()033. {034. IQueryable<TEntity> query = _dbSet;035. 036. return query;037. }038. 039. public virtual IQueryable<TEntity> Get(040. Expression<Func<TEntity, bool>> filter = null,041. Func<IQueryable<TEntity>, IOrderedQueryable<TEntity>> orderBy = null,042. string includeProperties = "")043. {044. IQueryable<TEntity> query = _dbSet;045. 046. if (filter != null)047. {048. query = query.Where(filter);049. }050. 051. foreach (var includeProperty in includeProperties.Split052. (new char[] { ',' }, StringSplitOptions.RemoveEmptyEntries))053. {054. query = query.Include(includeProperty);055. }056. 057. if (orderBy != null)058. {059. return orderBy(query);060. }061. else062. {063. return query;064. }065. }066. 067. public virtual TEntity GetById(object id)068. {069. return _dbSet.Find(id);070. }071. 072. public virtual void Insert(TEntity entity)073. {074. _dbSet.Add(entity);075. }076. 077. public virtual void Delete(object id)078. {079. TEntity entityToDelete = _dbSet.Find(id);080. Delete(entityToDelete);081. }082. 083. public virtual void Delete(TEntity entityToDelete)084. {085. if (_context.Entry(entityToDelete).State == System.Data.Entity.EntityState.Detached)086. {087. _dbSet.Attach(entityToDelete);088. }089. _dbSet.Remove(entityToDelete);090. }091. 092. public virtual void Update(TEntity entityToUpdate)093. {094. _dbSet.Attach(entityToUpdate);095. _context.Entry(entityToUpdate).State = System.Data.Entity.EntityState.Modified;096. }097. #endregion098. 099. #region Protected Members100. 101. protected Db Db102. {103. get104. {105. return _context ?? (_context = _unitOfWork.Db);106. }107. }108. 109. #endregion110. 111. }112.}The Get methods return IQueryable, which makes is easy to chain Linq extension methods off of these methods for any standard Linq operation that you need.
For example, if you need to apply more than one Where clause to your Linq statement, you can easily do this my calling the Get() or GetAll() methods.
var query = _dao.Get(p => p.Publish == true) .Where(p => p.Alias == "my-alias-name") .SingleOrDefault();
For most of these operations, you should call one of the various non-deferred operators such as:
- First()
- FirstOrDefault()
- Single()
- SingleOrDefault()
- ToList()
- etc
As you know, these methods execute the query and return data, which will then close the connection when it's completed. This will prevent you from getting the occasional exception that says there's another open connection that must be closed first.
Note! Just to be clear, the non-deferred operators and their usage have nothing to do with the Repository Pattern, they are instead specific to Linq-To-Entities.
Unit Of Work
This pattern helps make multiple transactions work as a single transaction, making them ATOMIC, meaning that they all succeed or they all fail.
If you are new to this idea, I'll use this scenario as an example:
Your application is going to save an Order for an existing Customer, with the Order Details. The Order Details are going to be saved, and the Order is going to be saved, but the Order Details throws an exception for an out-of-stock item. Meanwhile the Order is successfully saved.
This is a problem!
The Order is out-of-sync! It has no details. What should have happened is that the entire transaction should have failed when the Details failed, this way you wouldn't have an Order without any Details in the database.
The Unit of Work with the Entity Framework prevents this type of scenario by being able to wrap all operations in a single Commit() method which calls the DbContext.SaveChanges() method.
SaveChanges() is smart enough to know how to work with the context of operations in the current transaction, and is able to do them in the correct order. So if you have more than one operation, such as a Delete and then an Insert in the same transaction, EF will be able to execute it correctly.
Here's an example of how the Unit of Work can be used in an ASP.NET MVC application. In this example, the operation requires some records to be deleted, and then new records to be inserted. This can all be done with a single UnitOfWork.Commit() call.
01.[HttpPost]02.[ValidateAntiForgeryToken]03.[ValidateInput(false)]04.public ActionResult Edit(Post model, int[] tagNameList)05.{06. try07. {08. if (!ModelState.IsValid)09. return RedirectToAction("Edit", new { id = model.Id });10. 11. var ptList = _postTagService.Get(pt => pt.PostId == model.Id).ToList();12. 13. if (ptList.Count > 0)14. {15. foreach (var item in ptList)16. {17. _postTagService.Delete(item);18. }19. }20. 21. if (tagNameList != null)22. {23. foreach (var id in tagNameList)24. {25. Tag tag = _tagService.GetById(id);26. PostTag pt = new PostTag();27. pt.Post = model;28. pt.Tag = tag;29. _postTagService.Insert(pt);30. }31. }32. 33. model.DateUpdated = DateTime.Now;34. 35. _postService.Update(model);36. _unitOfWork.Commit();37. 38. return RedirectToAction("Index");39. }40. catch (Exception ex)41. {42. ModelState.AddModelError("", ex.Message);43. return RedirectToAction("Edit", new { id = model.Id });44. }45.}This is an example from this series, where we are editing a Post object, but also associating a list of Tags with this Post.
In this example, the method takes an array of Tag Ids (tagNameList) that were selected in the View as a parameter. These will be the new tags that we want to associate with this Post. But first I want to retrieve all the existing tags for this Post, and just to make it real easy, if any exist, I will delete them all. This way I don't have to cycle through and do a comparison to see if an incoming tag already exists and skip over it and go to the next, in order to figure out which new Tags to insert.
Next, if there are any incoming tags, I will loop through them and build a PostTag object, which is the many-to-many entity, that associates the Tag with the Post, and call the Insert() method.
If you notice, the UnitOfWork.Commit() method hasn't been called yet. It's only called after the Post has been updated. In this transaction, three operations are executed in a single call, making it efficient and ATOMIC.
IMPORTANT NOTE!!!
Regarding the UnitOfWork.Commit(), if you end up not using the Entity Framework, then you need to implement the Commit() method with whatever mechanism works with the framework you are using.
Data Objects Entity Interfaces
These interfaces are specific to the entities they represent. They all implement the IRepository<TEntity> interface, so they inherently carry along with them the CRUD operations.
This interface would represent the Post entity.
using System;using System.Linq;using BlogDemo.BusinessObjects;using BlogDemo.DataObjects.Generated;namespace BlogDemo.DataObjects.Interfaces{ public interface IPostDao : IRepository<Post> { }}The Post concrete class would then look like this:
using System;using System.Linq;using BlogDemo.BusinessObjects;using BlogDemo.DataObjects.Interfaces;namespace BlogDemo.DataObjects.Repositories{ public class PostDao : RepositoryBase<Post>, IPostDao { public PostDao(IUnitOfWork unitOfWork):base(unitOfWork) { } }}You can see it inherits from the RepositoryBase<TEntity> generic base class that contains the CRUD operations, plus it also implements the IPostDao interface where you would have your custom members that you implement.
The constructor takes a parameter of type IUnitOfWork and passes that to the base class, which will be used to instantiate the DbContext.
To be clear, this concrete class is operational now! It will perform all the CRUD operations without you having to add anything to the interface. The IPostDao interface is for your custom operations only.
Custom Operations
Here's an example of creating your own custom operation in the interface and implementing it in the concrete class.
using System;using System.Linq;using BlogDemo.BusinessObjects;using BlogDemo.DataObjects.Generated;namespace BlogDemo.DataObjects.Interfaces{ public interface IPostDao : IRepository<Post> { Post GetByAlias(string alias); }}Here is the concrete class implementation of this interface:
using System;using System.Linq;using BlogDemo.BusinessObjects;using BlogDemo.DataObjects.Interfaces;namespace BlogDemo.DataObjects.Repositories{ public class PostDao : RepositoryBase<Post>, IPostDao { public PostDao(IUnitOfWork unitOfWork):base(unitOfWork) { } public Post GetByAlias(string alias) { throw new NotImplementedException(); } }}And this is the fully implemented query:
using System;using System.Linq;using BlogDemo.BusinessObjects;using BlogDemo.DataObjects.Interfaces;namespace BlogDemo.DataObjects.Repositories{ public class PostDao : RepositoryBase<Post>, IPostDao { public PostDao(IUnitOfWork unitOfWork):base(unitOfWork) { } public Post GetByAlias(string alias) { return Db.Posts.Where(p => p.Alias == alias) .SingleOrDefault(); } }}In this particular design of the Repository Pattern, you also have this alternative to execute the query:
using System;using System.Linq;using BlogDemo.BusinessObjects;using BlogDemo.DataObjects.Interfaces;namespace BlogDemo.DataObjects.Repositories{ public class PostDao : RepositoryBase<Post>, IPostDao { public PostDao(IUnitOfWork unitOfWork):base(unitOfWork) { } public Post GetByAlias(string alias) { //return Db.Posts.Where(p => p.Alias == alias) // .SingleOrDefault(); return Get(p => p.Alias == alias) .SingleOrDefault(); } }}My personal preference is to place all my custom operations in the Service layer, and only have very complex queries in the Data Objects layer when they can't be created easily in the service layer.
The Service Layer
The Service Layer is the end point where any and all clients will communicate for access to data. And these clients can be the controllers in an ASP.NET MVC application, a WebApi service, etc. Methods in the Data Objects will never be called directly. You do not need to follow my example in this, you can build your application any way you want, and if you want to call some Data Objects methods directly from various clients, that's your choice. But this tends to add to the complexity of maintenance in your application.
I want all methods to be available in the Service layer, this also includes any very complex operations that I had to create in my Data Objects layer. There will be a mirrored method in the service class that will return that data.
The Service Layer will be my one location where all my query operations live. This allows me to quickly maintain my application because I don't need to look all over my application for how a specific operation is executed.
You can also be very creative and create non-entity based operations in the service layer. For example, I had a golf scoring application I built for a client and I wanted to build a class that handled scoring. I had no Scoring entity. Scoring was more of a concept, but I added a /Scoring folder to the service project and placed all my Scoring related classes in that folder, again helping me organize my code. I knew exactly where my algorithms were.
Here's a look at a typical Service interface:
using System;using System.Collections.Generic;using System.Linq;using BlogDemo.BusinessObjects;using BlogDemo.BusinessObjects.ViewModels;using BlogDemo.Services.Generated;namespace BlogDemo.Services.Interfaces{ public interface IPostService : IService<Post> { }}Here's a look at the IService<TEntity> interface. You'll see it's identical to the IRepository<TEntity> interface.
using System;using System.Collections.Generic;using System.Linq;using System.Linq.Expressions;namespace BlogDemo.Services.Generated{ public interface IService<TEntity> { IEnumerable<TEntity> Get( Expression<Func<TEntity, bool>> filter = null, Func<IQueryable<TEntity>, IOrderedQueryable<TEntity>> orderBy = null, string includeProperties = ""); TEntity GetById(object id); void Insert(TEntity entity); void Delete(object id); void Delete(TEntity entityToDelete); void Update(TEntity entityToUpdate); }}The Service layer too has a base class that wraps all the CRUD operations into a nice segregated package.
using System;using System.Collections.Generic;using System.Linq;using BlogDemo.DataObjects.Generated;namespace BlogDemo.Services.Generated{ /// <summary> /// The common base class for CRUD operations. /// </summary> /// <typeparam name="T">the business object</typeparam> /// <typeparam name="TInterface">the data objects repository interface</typeparam> public class ServiceBase<T, TInterface> : IService<T> where TInterface : IRepository<T> { #region Constructors protected readonly TInterface _dao; public ServiceBase(TInterface dao) { this._dao = dao; } #endregion #region CRUD Operations public IEnumerable<T> Get( System.Linq.Expressions.Expression<Func<T, bool>> filter = null, Func<IQueryable<T>, IOrderedQueryable<T>> orderBy = null, string includeProperties = "") { return _dao.Get(filter, orderBy, includeProperties); } public T GetById(object id) { return _dao.GetById(id); } public void Insert(T entity) { _dao.Insert(entity); } public void Delete(object id) { T entity = _dao.GetById(id); _dao.Delete(entity); } public void Delete(T entityToDelete) { _dao.Delete(entityToDelete); } public void Update(T entityToUpdate) { _dao.Update(entityToUpdate); } #endregion }}What's nice about this way I implemented this generic base class, is that it's easy to access the Data Access Object (dao) for the Entity by simply calling a method off of the _dao object.
This is a look at the concrete service class for the Post entity:
using System;using System.Collections.Generic;using System.Linq;using BlogDemo.BusinessObjects;using BlogDemo.BusinessObjects.ViewModels;using BlogDemo.DataObjects.Interfaces;using BlogDemo.Services.Generated;using BlogDemo.Services.Interfaces;namespace BlogDemo.Services{ public class PostService : ServiceBase<Post, IPostDao>, IPostService { public PostService(IPostDao postDao) : base(postDao) { } }}You can see again, it's very similar to the Data Objects concrete classes in it's implementation. Dependency Injection takes care of passing the IPostDao interface in the constructor to the ServiceBase class.
Here's an example of how to implement a custom operation in the service class. First I need to add a member to the interface.
using System;using System.Collections.Generic;using System.Linq;using BlogDemo.BusinessObjects;using BlogDemo.BusinessObjects.ViewModels;using BlogDemo.Services.Generated;namespace BlogDemo.Services.Interfaces{ public interface IPostService : IService<Post> { /// <summary> /// Get all published Posts, plus any associated Tags. /// </summary> /// <param name="alias">The post alias</param> /// <returns></returns> List<BlogPostViewModel> GetPublishedPosts(string alias); }}using System;using System.Collections.Generic;using System.Linq;using BlogDemo.BusinessObjects;using BlogDemo.BusinessObjects.ViewModels;using BlogDemo.DataObjects.Interfaces;using BlogDemo.Services.Generated;using BlogDemo.Services.Interfaces;namespace BlogDemo.Services{ public class PostService : ServiceBase<Post, IPostDao>, IPostService { public PostService(IPostDao postDao) : base(postDao) { } public List<BlogPostViewModel> GetPublishedPosts(string alias) { // Create a filter predicate for the optional Where clause. Func<Post, bool> tagNameFilter = null; // If the alias exists, create the predicate statement. if (!string.IsNullOrEmpty(alias)) { tagNameFilter = p => p.PostTagList.Select(ptl => ptl.Tag.Alias).Contains(alias); } // Create the base query to retrieve all published Posts in date descending order, // and include the associated Tags. var query = _dao.Get(p => p.Publish == true, p => p.OrderByDescending(o => o.DateCreated), "PostTagList.Tag"); // Now determine if the filter predicate is not null and apply it to the // existing IQueryable query. if (tagNameFilter != null) { query = query.Where(tagNameFilter).AsQueryable(); } // Finally take the query and populate a ViewModel with the data. return query.Select(p => new BlogPostViewModel { Id = p.Id, Title = p.Title, SubTitle = p.SubTitle, ShortDescription = p.ShortDescription, Alias = p.Alias, DateCreated = p.DateCreated, Author = p.Author, TagList = p.PostTagList.Select(t => new TagViewModel() { Id = t.Tag.Id, TagName = t.Tag.TagName, Alias = t.Tag.Alias }).ToList() }).ToList(); } }}This particular method has two uses:
- Return all Posts and their Tags - no tag alias
- Return a filtered list of Posts and it's Tags - based on the tag alias selected
By returning a custom ViewModel class instead of the entity, it eliminates the dreaded circular reference exception that occurs when two entities that are associated with each other, relate back to each other. It requires a little extra work, but it makes the application stronger.
Some developers argue that POCO's should NEVER end up in the View. I'm on the fence about that. I feel it's OK in many circumstances, but not all.
On the public site, when a user clicks on a Tag link for a Post, it will execute this query, or the query will be executed and return all published posts when the page is requested. So depending on whether the Tag Alias exists will determine how the query is constructed. Either way it returns the data structured the same way, it just may return a different set of data depending on the method parameter (alias).
Presentation Layer - ASP.NET MVC
Here's where you get to see that Repository Pattern in action. The ASP.NET MVC 5 application will be used to demonstrate how to build your applications to utilize the Repository Pattern in a real world application.
You simply have to make a reference to your Services, Business Objects and Data Objects in the MVC application in order to get access to them.
NOTE!!! - the Data Objects are necessary in the Presentation Layer for two reasons:
- Ninject - in order to make dependency injection work, Ninject needs the data objects along with the service layer objects
- UnitOfWork - in order to use the Commit() method of the UnitOfWork in your controllers, the Data Objects need to be referenced in the MVC application.
Then you need to have an easy way of getting access to the interfaces by using dependency injection. I use Ninject, but you can use any IoC container that you prefer.
I'll import Ninject into my application by using the Visual Studio Package Manager Console.
install-package ninject.mvc5When this completes, you'll have the NinjectWebCommon.cs class in your App_Start folder. Open that file and add the following code to the RegisterServices(IKernel kernel) method.
private static void RegisterServices(IKernel kernel){ kernel.Bind<IUnitOfWork>().To<UnitOfWork>().InRequestScope(); kernel.Bind<IPostService>().To<PostService>(); kernel.Bind<IPostTagService>().To<PostTagService>(); kernel.Bind<ISiteSettingService>().To<SiteSettingService>(); kernel.Bind<ITagService>().To<TagService>(); kernel.Bind<IPostDao>().To<PostDao>(); kernel.Bind<IPostTagDao>().To<PostTagDao>(); kernel.Bind<ISiteSettingDao>().To<SiteSettingDao>(); kernel.Bind<ITagDao>().To<TagDao>();}Depending on how you created your ASP.NET MVC application, you may need to install Entity Framework via NuGet as well. Once you have these components installed, you can access your service classes from your controllers.
Here is the TagController class from the sample application:
using System;using System.Linq;using System.Web.Mvc;using BlogDemo.BusinessObjects;using BlogDemo.DataObjects;using BlogDemo.Mvc.Controllers;using BlogDemo.Mvc.ViewData;using BlogDemo.Services.Interfaces;namespace BlogDemo.Mvc.Areas.Portal.Controllers{ public class TagController : BaseController { #region ctors private readonly ITagService _tagService; private readonly IUnitOfWork _unitOfWork; public TagController(ITagService tagService, IUnitOfWork unitOfWork) { this._unitOfWork = unitOfWork; this._tagService = tagService; } #endregion #region MVC Actions public ActionResult Index() { TagViewData viewData = ViewDataFactory.CreateBaseViewData<TagViewData>("Tag List"); viewData.TagList = _tagService.Get().ToList(); return View(viewData); } public ActionResult Details(int id) { TagViewData viewData = ViewDataFactory.CreateBaseViewData<TagViewData>("Tag Details"); viewData.Tag = _tagService.GetById(id); return View(viewData); } public ActionResult Create() { TagViewData viewData = ViewDataFactory.CreateBaseViewData<TagViewData>("Create Tag"); viewData.Tag = new Tag() { }; return View(viewData); } [HttpPost] [ValidateAntiForgeryToken] public ActionResult Create([Bind(Exclude="Id,rowversion")]Tag model) { try { if (!ModelState.IsValid) return RedirectToAction("Create"); _tagService.Insert(model); _unitOfWork.Commit(); return RedirectToAction("Index"); } catch (Exception ex) { ModelState.AddModelError("", ex.Message); return RedirectToAction("Create"); } } public ActionResult Edit(int id) { TagViewData viewData = ViewDataFactory.CreateBaseViewData<TagViewData>("Edit Tag"); viewData.Tag = _tagService.GetById(id); return View(viewData); } [HttpPost] [ValidateAntiForgeryToken] public ActionResult Edit(Tag model) { try { if (!ModelState.IsValid) return RedirectToAction("Edit", new { id = model.Id }); _tagService.Update(model); _unitOfWork.Commit(); return RedirectToAction("Index"); } catch (Exception ex) { ModelState.AddModelError("", ex.Message); return RedirectToAction("Edit", new { id = model.Id }); } } public ActionResult Delete(int id) { TagViewData viewData = ViewDataFactory.CreateBaseViewData<TagViewData>("Delete Tag"); viewData.Tag = _tagService.GetById(id); return View(viewData); } [HttpPost] [ValidateAntiForgeryToken] public ActionResult Delete([Bind(Prefix="Tag")]Tag model) { try { _tagService.Delete(model.Id); _unitOfWork.Commit(); return RedirectToAction("Index"); } catch (Exception) { return RedirectToAction("Delete", new { id = model.Id }); } } #endregion }}You can clearly see how easy it is to integrate the Repository Pattern into your client application using the appropriate technologies. Dependency Injection helps instantiate the concrete classes for the interfaces in the controller constructor. From there you have complete access to all the available methods of the service class, whether they are the original CRUD operations, or your custom methods.
WebApi
You can also integrate the Repository Pattern into WebApi for easy access to the service methods to the client.
As an example I'll show the Post view in the Portal that allows site owners to manage their Posts. As with many Blogs, you can associate Tags with a post that makes it was for visitors to filter by a Tag. In order to associate a Tag with a Post, there needs to be a way of displaying all available Tags when editing a Post and selecting one or more of the Tags.
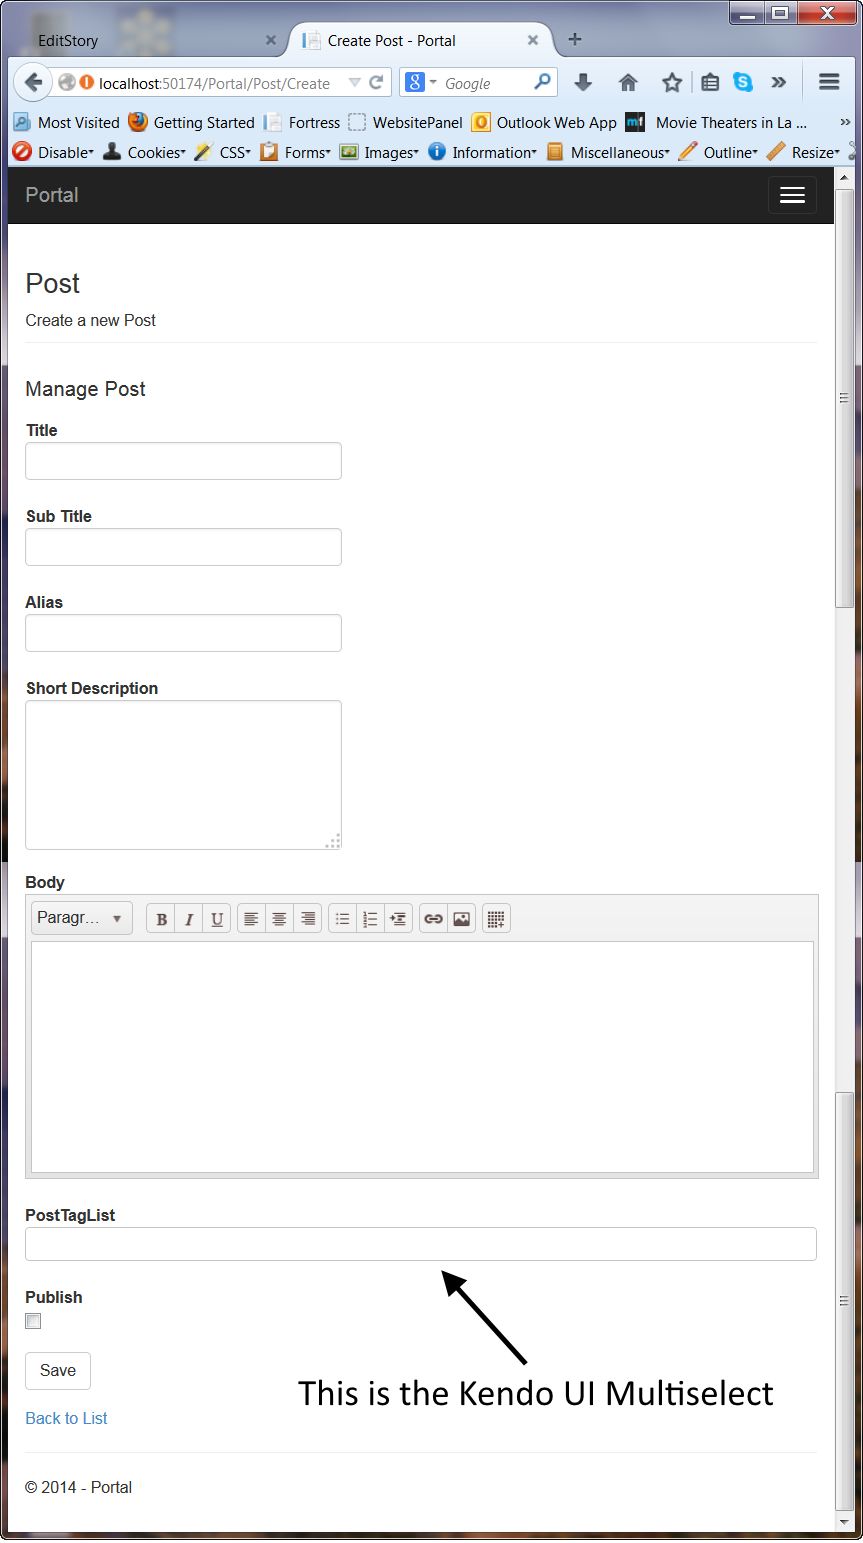
This is the Create view for the Post entity, it contains a reusable Partial View:
@model BlogDemo.Mvc.ViewData.PostViewData@{ ViewBag.Title = Model.PageTitle; Layout = "~/Areas/Portal/Views/Shared/_LayoutPage.cshtml";}<!--=== Page Header ===--><div class="page-header"> <div class="page-title"> <h3>Post</h3> <span>Create a new Post</span> </div></div><!-- /Page Header --><!--=== Page Content ===--><div class="row"> <!--=== Example Box ===--> <div class="col-md-12"> <div class="widget box"> <div class="widget-header"> <h4><i class="icon-reorder"></i> Manage Post</h4> </div> <div class="widget-content"> @Html.Partial("_CreateEdit", Model.Post) </div> </div> </div> <!-- /.col-md-12 --> <!-- /Example Box --></div> <!-- /.row --><!-- /Page Content --><div> @Html.ActionLink("Back to List", "Index")</div>@section scripts { @Scripts.Render("~/bundles/jqueryval") <script type="text/javascript"> $("form").addClass("form-horizontal"); </script>}The Edit view is identical to this, and if the Edit and Create views will be presenting the same form fields, a Partial View is a good choice for this purpose. It keeps things DRY (don't repeat yourself).
Here's a look at the Partial View:
01.@model BlogDemo.BusinessObjects.Post02. 03.@using (Html.BeginForm())04.{05. @Html.AntiForgeryToken()06. @Html.ValidationSummary()07. 08. <div class="form-group">09. @Html.LabelFor(model => model.Title, new { @class = "control-label col-md-2" })10. <div class="col-md-10">11. @Html.TextBoxFor(model => model.Title, new { @class = "form-control" })12. @Html.ValidationMessageFor(model => model.Title)13. </div>14. </div>15. 16. <div class="form-group">17. @Html.LabelFor(model => model.SubTitle, new { @class = "control-label col-md-2" })18. <div class="col-md-10">19. @Html.TextBoxFor(model => model.SubTitle, new { @class = "form-control" })20. @Html.ValidationMessageFor(model => model.SubTitle)21. </div>22. </div>23. 24. <div class="form-group">25. @Html.LabelFor(model => model.Alias, new { @class = "control-label col-md-2" })26. <div class="col-md-10">27. @Html.TextBoxFor(model => model.Alias, new { @class = "form-control" })28. @Html.ValidationMessageFor(model => model.Alias)29. </div>30. </div>31. <div class="form-group">32. @Html.LabelFor(model => model.ShortDescription, new { @class = "control-label col-md-2" })33. <div class="col-md-10">34. @Html.TextAreaFor(model => model.ShortDescription, 5, 60, new { @class = "form-control" })35. @Html.ValidationMessageFor(model => model.ShortDescription)36. </div>37. </div>38. 39. 40. <div class="form-group">41. @Html.LabelFor(model => model.Body, new { @class = "control-label col-md-2" })42. <div class="col-md-10">43. @Html.EditorFor(model => model.Body, new { @class = "form-control" })44. @Html.ValidationMessageFor(model => model.Body)45. </div>46. </div>47. 48. <div class="form-group">49. @Html.LabelFor(model => model.PostTagList, new { @class = "control-label col-md-2" })50. <div class="col-md-10">51. @(Html.Kendo().MultiSelect().Name("tagNameList")52. .DataTextField("TagName")53. .DataValueField("Id")54. .AutoBind(false)55. .DataSource(ds => ds.Read(read => read.Url("/api/tag")))56. )57. </div>58. </div>59. 60. <div class="form-group">61. @Html.LabelFor(model => model.Publish, new { @class = "control-label col-md-2" })62. <div class="col-md-10">63. @Html.EditorFor(model => model.Publish)64. @Html.ValidationMessageFor(model => model.Publish)65. </div>66. </div>67. 68. 69. <div class="form-group">70. <div class="col-md-offset-2 col-md-10">71. <input type="submit" value="Save" class="btn btn-default" />72. </div>73. </div>74. 75. @Html.HiddenFor(model => model.Id)76. @Html.HiddenFor(model => model.DateCreated)77. @Html.HiddenFor(model => model.DateUpdated)78. @Html.HiddenFor(model => model.Author)79. @Html.HiddenFor(model => model.Views)80. @Html.HiddenFor(model => model.rowversion)81. 82.}83. 84.<div class="clearfix"></div>Line 51 contains the markup for the Kendo Multiselect widget that will display all the tags, and allows the user to choose any number of tags that will be associated with this Post.
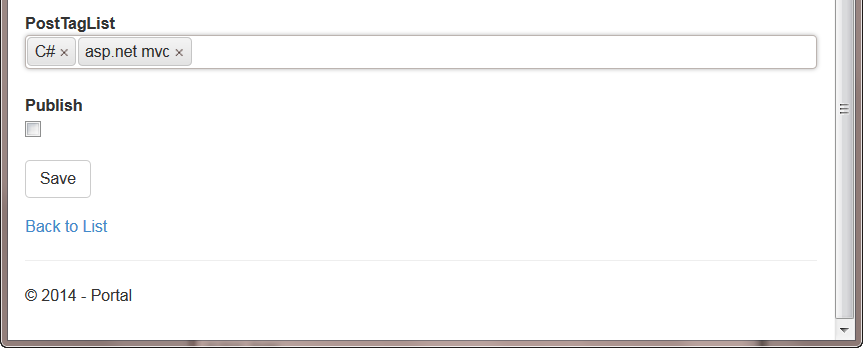
Here's what the page looks like:
When you click inside the field you can see the available Tags.
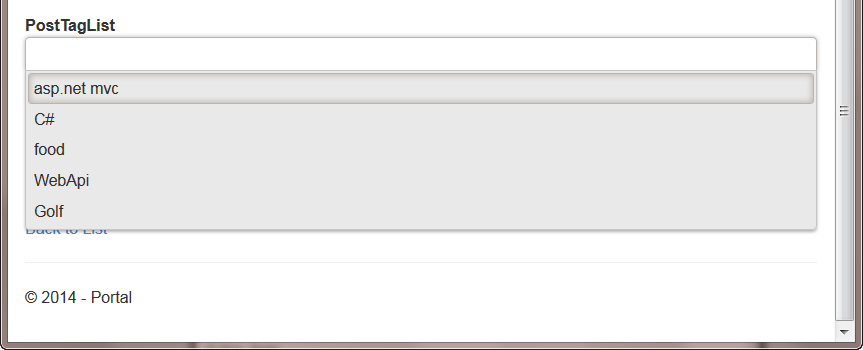
And you can select one-at-a-time to create a list of Tags associated with this Post.
This Kendo UI widget gets populated with the help of WebApi communicating with the Service classes and the Repository Pattern. Here's another look at the HTML markup for the widget.
01.<div class="form-group">02. @Html.LabelFor(model => model.PostTagList, new { @class = "control-label col-md-2" })03. <div class="col-md-10">04. @(Html.Kendo().MultiSelect().Name("tagNameList")05. .DataTextField("TagName")06. .DataValueField("Id")07. .AutoBind(false)08. .DataSource(ds => ds.Read(read => read.Url("/api/tag")))09. )10. </div>11.</div>Line 8 points to the external datasource that will populate the widget with data. It's pointing to "/api/tag", which is a WebApi controller. By convention "/api" simply makes it easy for us to differentiate between our MVC controllers, and a WebApi controller. The "tag" designation identifies what controller in the WebApi to call. And still by convention, no controller action is set because the default will be used and since WebApi primarily works via a REST pattern, the default HTTP method is GET, so the CRUD operation of Get will be called on the Tag controller.
Dependency Injection Note for WebApi:
By default, dependency injection for WebApi will NOT work out-of-the-box with Ninject. You have to do a couple very simple things to make it work.- Include two helper classes
- Add a line of code to the Common class
- NinjectDependencyResolver
- NinjectDependencyScope
These are both included in the demo code for this project. Once you have them in your project, you simply need to add a single line of code to the NinjectWebCommon.cs class.
01.private static IKernel CreateKernel()02.{03. var kernel = new StandardKernel();04. try05. {06. kernel.Bind<Func<IKernel>>().ToMethod(ctx => () => new Bootstrapper().Kernel);07. kernel.Bind<IHttpModule>().To<HttpApplicationInitializationHttpModule>();08. 09. RegisterServices(kernel);10. 11. // Set Web API Resolver12. GlobalConfiguration.Configuration.DependencyResolver = new NinjectDependencyResolver(kernel);13. 14. return kernel;15. }16. catch17. {18. kernel.Dispose();19. throw;20. }21.}Just add line 12 to the method and WebApi is all hooked up.
Now back to our regularly scheduled article...
Here's a look at the WebApi Tag controller:using System;using System.Linq;using BlogDemo.BusinessObjects;using BlogDemo.DataObjects;using BlogDemo.Services.Interfaces;namespace BlogDemo.Mvc.Controllers.api{ public class TagController : BaseController<Tag> { #region ctors private readonly ITagService _tagService; private readonly IUnitOfWork _unitOfWork; public TagController(ITagService tagService, IUnitOfWork unitOfWork) :base(tagService, unitOfWork) { this._tagService = tagService; this._unitOfWork = unitOfWork; } #endregion #region Public Methods #endregion }}This WebApi controller inherits from a base class that contains all the CRUD operations for REST-based requests, so these type of requests are all abstracted away so you can place your custom operations in the region named "Public Methods". And it uses dependency injection like an MVC controller.
This is the WebApi generic base class:
using System;using System.Collections.Generic;using System.Linq;using System.Net;using System.Net.Http;using System.Web.Http;using BlogDemo.BusinessObjects;using BlogDemo.DataObjects;using BlogDemo.Services.Generated;namespace BlogDemo.Mvc.Controllers.api{ /// <summary> /// This is the common base ApiController used for all controllers. /// It will be used primarily for GET operations, even though it has /// the other CRUD operations enabled. Other operations such as POST, /// PUT, DELETE, etc., should be used only where absolutely necessary, /// and only in the Admin Area, not the public site. /// </summary> /// <typeparam name="T">a business object type</typeparam> public class BaseController<T> : ApiController where T : Entity { #region ctors private readonly IService<T> _service; private readonly IUnitOfWork _unitOfWork; public BaseController(IService<T> service, IUnitOfWork unitOfWork) { this._unitOfWork = unitOfWork; this._service = service; } #endregion #region Basic CRUD /// <summary> /// Get all the Products in the repository. /// </summary> /// <returns></returns> public IEnumerable<T> Get() { return _service.Get(); } /// <summary> /// Get the selected Entity. /// </summary> /// <param name="id">Id</param> /// <returns></returns> public T Get(int id) { T model = _service.GetById(id); if (model == null) throw new HttpResponseException(Request.CreateResponse(HttpStatusCode.NotFound)); return model; } /// <summary> /// Insert a new Product into the repository. /// </summary> /// <param name="model">Product</param> /// <returns></returns> /// [Authorize] public HttpResponseMessage Post(T model) { if (ModelState.IsValid) { _service.Insert(model); _unitOfWork.Commit(); var response = Request.CreateResponse(HttpStatusCode.Created, model); response.Headers.Location = new Uri(Url.Link("DefaultApi", new { id = model.Id })); return response; } else { throw new HttpResponseException(new HttpResponseMessage(HttpStatusCode.BadRequest)); } } /// <summary> /// Update the selected Product. /// </summary> /// <param name="id">Id</param> /// <param name="model">Product</param> /// <returns></returns> /// [Authorize] public HttpResponseMessage Put(T model) { if (ModelState.IsValid) { try { _service.Update(model); _unitOfWork.Commit(); } catch (Exception) { return Request.CreateResponse(HttpStatusCode.NotFound); } return Request.CreateResponse(HttpStatusCode.OK, model); } else { return Request.CreateResponse(HttpStatusCode.BadRequest); } } /// <summary> /// Delete the selected Product. /// </summary> /// <param name="id">Id</param> /// <returns></returns> /// [Authorize] public HttpResponseMessage Delete(int id) { T model = _service.GetById(id); if (model == null) { return Request.CreateResponse(HttpStatusCode.NotFound); } try { _service.Delete(model); _unitOfWork.Commit(); } catch (Exception) { return Request.CreateResponse(HttpStatusCode.NotFound); } return Request.CreateResponse(HttpStatusCode.OK, model); } #endregion }}Summary
I hope you enjoyed this series on the Repository Pattern and Unit of Work in Action. Remember, the Repository Pattern is more of a concept than a strict pattern. It's a way of abstracting away the dirty inner workings of data access and making it more user friendly.
The IRepository interface is where it all starts, and it does not need to be generic as in this example, but by being generic, it makes it more flexible and code-generator friendly.
The Repository Pattern also begins and ends in the data layer. It's a way of organizing the way you access your data into simple classes and methods. Whether you want to add another layer of abstraction on top of it with a Service layer, is entirely up to you.
I appreciate the time and hope this series was helpful to you.